Introduction
Okay, you caught me—I’ve spent embarrassingly many evenings scouring gear reviews, binge-watching unboxing videos at midnight (when I should’ve been asleep), and clicking “buy” on backpacks that looked perfect in glossy photos… only to send them right back. There was that infamous morning I slung what was billed as a “rugged expedition pack” over my shoulders, tromped out onto a wet granite trail, and heard a faint zzzzip as a seam unraveled. For a moment, I stood there with my tripod poking through the rip, wondering if I could actually Photoshop that into some epic “survived the wild” shot. Spoiler alert: I did not. Instead, I hiked back down, half-embarrassed, fully drenched, and secretly vowing never to skimp on quality again.
If you’ve ever cursed at your pack’s zipper in the rain, woken up scrunched and sore because the hip belt shifted, or simply felt like your gear was elbowing each other inside the bag, you’re in exactly the right place. In this… let’s call it a somewhat meandering, occasionally tangential conversation, I’m going to share what really matters when choosing a hiking camera backpack—no marketing jargon, no bullet-pointed spec sheet, but plenty of hard-won lessons, a dash of self-deprecating humor, and a lineup of ten packs I’ve tested (some for a week, others for seasons).
By the end, you’ll know the core features that keep your lenses happy and your shoulders sane, the trade-offs worth making (and those to avoid), how to match a pack to your kit and trails, and simple care tips so your investment lasts longer than that fleeting peak-bagging Instagram trend. So fill your water bottle, grab a snack—maybe a granola bar that you’ll actually finish this time—and let’s wade into what makes a backpack not just “good,” but downright perfect for your next outdoor shoot.
Section 1: What Really Matters in a Hiking Camera Backpack
Durability & Weather Resistance
Let’s start with the obvious—durability. It’s tempting to eyeball a pack’s style or color first, but a bag’s true test comes when you’re two miles from your car and the forecasted “light shower” turns into full-blown misty chaos. On one soggy afternoon in Oregon’s temperate rainforests, my “budget” pack soaked through like a paper towel in a fountain. My DSLR fared better than that pack did, but it was enough to make me swear off cheap canvas forever.
Now I look for high-denier fabrics—400D or higher—or polyester blends treated with DWR (Durable Water Repellent). These materials cause raindrops to bead up and roll off rather than seep in. And check the stitching: sealed seams or taped zippers add another layer of protection. I know rain covers can seem like an easy hack, but trust me: there’s an art to stuffing and retrieving them, and you’ll probably leave yours at home the first few trips. Better to have built-in defense you can deploy instinctively.
Comfort & Ergonomics
One of my earliest lessons? Even the toughest pack can feel like a medieval torture device if the harness system is poorly designed. If you’re carrying more than a minimal mirrorless setup—say, a DSLR, two or three lenses, maybe a lightweight tripod—you’ll want padded, contoured shoulder straps that distribute weight evenly. A solid hip belt is your best friend; it transfers load to your pelvis, which your body can handle more comfortably than your shoulders alone.
And please, don’t forget ventilation. Mesh or molded-foam back panels with airflow channels make the difference between arriving at camp sweaty and soggy, or feeling fresh enough to line up that night shot under a starry sky. I once hiked the Grand Canyon’s Bright Angel Trail with a pack that looked great but had zero airflow. By the time I reached the river, I resembled a damp paper bag. Lesson learned: comfort matters as much as capacity.
Storage Design & Accessibility
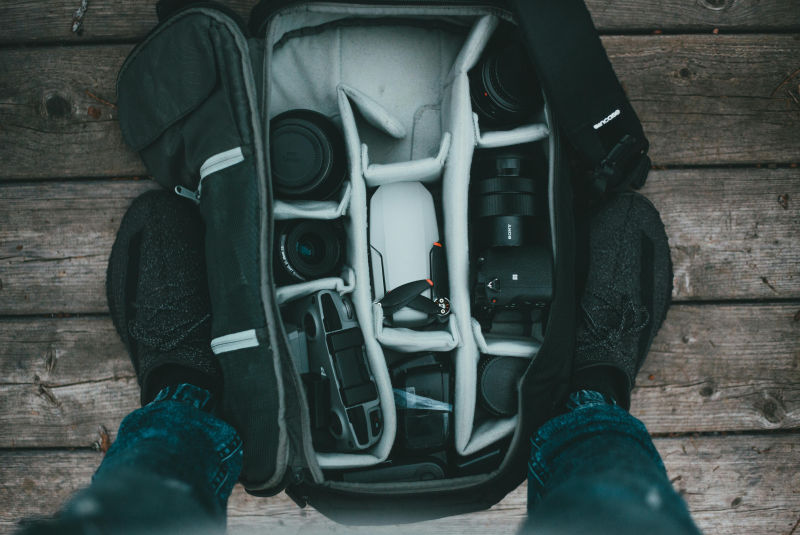
You know that moment when the sunrise paints the canyon walls in golden hues and everything else in the world stops? That’s when you need your gear now. Digging through a cavernous main compartment rarely ends well. Instead, look for packs with built-in, padded divider systems—often called ICUs or FlexFold inserts—that stay exactly where you position them. I’m deeply suspicious of removable cubes that tumble around; maybe you’re zen with that, but I am not.
Quick-access pockets are non-negotiable. Side or top panels that let you slide in a lens or camera body without fully removing the pack will save precious seconds. And tripods: side-mount straps can snag on branches, while bottom mounts keep sides clear but can block bottle holders. Think about your usual hikes: dense forest? Go bottom. Open ridges? Side is fine. Little decisions like these add up.
Weight & Volume
Every extra ounce feels like a pound after mile three. For mirrorless rigs and quick day hikes, 20–30 liters is often enough. Add a full DSLR kit with telephotos or a small balloon-drone, and you may need 30–40 liters. But watch out: ultralight fabrics shave grams but can tear on rocks. I once picked a pack boasting a two-pound shell weight—until it shredded against a rough boulder. Now, I lean slightly heavier fabric if it means fewer tears and a longer lifespan.
Bonus Perks: Hydration, Security & Tech
Let’s be honest: water bottles dangling from carabiners are charming the first time, until one slips off and breaks on a rock. A hydration-bladder sleeve tucks a reservoir neatly inside, freeing up side pockets for snacks or extra filters. Lockable zippers or hidden pockets add peace of mind in trailhead lots or hostel dorms. And for those who edit on the go, a padded laptop or tablet sleeve—ideally accessible without unloading the entire pack—is pure luxury. These features aren’t strictly essential, but once you’ve had them, you’ll wonder how you ever hiked without.
Section 2: Ten Packs I’d Trust on Any Trail
Alright, enough theory. Here are ten backpacks that have weathered my expectations (and occasionally my temper). I’ve pushed some of these through multiple seasons, others just enough to know they’re no one-hit-wonders. Let’s picture you wrestling each one on… because that’s part of figuring out if it’s really for you.
Peak Design Everyday Backpack 30L
Imagine a pack that blends seamlessly from urban coffee shoot to alpine ridge. Made of 400D weatherproof nylon with DWR, it shrugged off a misty morning in the Cascades without complaint. The MagLatch system lets you open it in one motion—handy when your other hand’s already full—and FlexFold dividers let you reconfigure on the fly. There’s even a hidden side pocket for a 16″ laptop, perfect for airport security lines. At $300, it’s an investment, but if you want one bag for everything, this is a top contender. Just note: when you pack it full, you’ll feel those extra ounces.
Lowepro ProTactic BP 350 AW II
This pack feels like it was designed by someone who’s asked, “What if I had to reconfigure my gear mid-hunt?” Integrated All-Weather cover, SlipLock accessory straps, and four-way access—top, back, both sides—mean you can swap lenses or pouches without missing a beat. I once added a mini-first-aid pouch and a GPS holder on the fly, and it was impressive how well they stayed put. At about $220, it’s rugged and versatile (if you don’t mind the tactical look). The harness system can feel bulky, but when you’re supporting heavy loads, you’ll appreciate the support.
MindShift Gear BackLight 26L
Perfect for wildlife and landscape photographers who crave stealth. Your camera nestles against your back, concealed from view until you need it—ideal for dawn shoots in bird-heavy reserves. The ventilated harness kept me cool during a humid Louisiana swampland morning, and side straps handled my tripod without fuss. It’s snug for large DSLR setups, but for a moderate mirrorless kit, it’s a revelation in quiet access.
F-Stop Gear Ajna 40L (with ICU)
Think of this as the modular Lego of camera packs. You choose an ICU—Internal Camera Unit—for your kit, slot it into the spacious main compartment, then pack your clothes, tents, or snacks around it. On a week-long backcountry trek, I swapped between a compact mirrorless ICU and a bulkier DSLR ICU without a hitch. The RotoLoc waist belt and sternum harness disperse weight beautifully, and a snow collar shields against wind-driven rain. It’s pricey if you need multiple ICUs, and there’s a small learning curve, but the flexibility is unmatched.
Tenba Solstice 20L Backpack
My “I need something quick and cheap” go-bag. For under $100, you get ripstop polyester, a rain cover, and padded dividers that maintain structure. I once grabbed this for a spontaneous forest shoot and ended up caught in a downpour; it kept my kit dry and proved that you don’t always need to splurge. Not flashy, but for beginners or minimalists, it’s a solid starter.
Osprey Transporter FlapPack 35L
City commuter one moment, trail warrior the next. Tarpaulin fabric makes it nearly waterproof, and the front flap opening offers quick gear access—handy when you’re hopping off a subway or stepping over a muddy creek. Priced around $200, it’s heavier than some rivals, and wrestling with the flap can feel fiddly, but for a sleek, durable hybrid, it’s hard to top.
Tenba Axis 45L Rolling Duffel & Backpack Combo
When you need wheels through airports and straps on trails, this is your Swiss Army pack. The detachable trolley system rolls through terminals, then you clip on the harness for rough roads. Spacious enough for multi-day kits—think cold-weather gear or lighting rigs—and padded dividers keep everything snug. It’s a heavyweight commitment at $320, but for extended shoots, you’ll be glad you have it.
Think Tank StreetWalker HardDrive V2.0
If you prefer to look like a commuter rather than a tourist, this stealthy pack blends right in. Hidden exterior pockets give quick lens and body access, while a padded laptop sleeve and stretchy front pouch handle filters, cables, or your favorite snack. Comfort is surprisingly high for city strolls, though you’ll need a separate rain cover for serious downpours. It’s not built for hardcore mountaineering, but for urban shoots and café-side edits, it excels.
Peak Design Everyday Sling 10L
For those runs to the overlook when you only need a mirrorless body, a lens or two, and maybe a filter kit, this sling is magic. Toss it over your shoulder, swivel it around, and voilà—instant gear access without full pack removal. FlexFold dividers let you tweak layouts, and the same weatherproof materials keep your gear dry. Capacity is obviously limited, and overload it and the sling can twist, but for lightning-fast side trips, it’s unbeatable.
Mountainsmith Borealis Camera Pack 25L
A friend’s first wildlife shoot used this affordable pack. For $80, you get dual water-bottle pockets, an adjustable camera insert, airflow back panel, and decent padding. We tromped through dusty trails and marshy edges; her gear stayed snug and protected. It lacks premium bells and whistles, but as an intro pack, it’s surprisingly capable.
Section 3: Matching a Pack to Your Needs
You’ve met ten worthy candidates—so how do you pick one?
First, inventory your kit: DSLR plus three lenses, a drone, tripod, and layers? Or a mirrorless body with a pancake lens and water bottle? That tells you if you need 20–30L or 30–40L.
Second, consider your terrain: quick four-hour forest loops? A mid-sized pack will do. Multi-day alpine ventures? Go larger or modular. Factor in climate: wet regions demand high-denier shells and sealed seams; hot, humid areas reward mesh-ventilated back panels.
Third, set your budget: under $100, you’re looking at Tenba Solstice or Mountainsmith Borealis; $100–$200 opens up Peak Design Sling, Osprey FlapPack, and Think Tank StreetWalker; above $200, you enter premium territory with Peak Design Everyday Backpack, Lowepro ProTactic, and F-Stop Ajna.
Finally, if possible, try before you buy: load it with comparable weight—books or bottled water—adjust straps, and walk around your block. If it pinches, bounces, or feels… off, keep looking. The right pack should feel like it’s barely there, letting you focus on the next shot, not on shifting straps.
Section 4: Keeping Your Pack in Top Shape
You’ve chosen your sidekick—now treat it well. After every outing, give it a good shake to dump out dirt, pine needles, or granola crumbs. Spot-clean with mild soap and water—harsh detergents can strip that precious DWR finish. Always air-dry completely; damp, hidden corners are a mold’s dream. A squirt of silicone-based zipper lubricant every few months keeps pulls gliding, and a quick seam inspection helps you catch frays before they become full-blown tears. A little TLC goes a long way toward seasons of reliable use.
Conclusion
Wow—thanks for sticking with my rambling gear ramble. If I had to pick three standouts, I’d go with the Peak Design Everyday Backpack 30L for all-around excellence; the Tenba Solstice 20L for budget-friendly day hikes; and the Peak Design Everyday Sling 10L for rapid-fire minimalism. But remember, the “perfect” pack is the one that feels tailor-made for your body, your gear, and your adventures. Whichever you choose, may your shoulders stay comfy, your lenses stay dry, and your shots be endlessly breathtaking.
So, what’s your next pack going to be? Or do you have a backpack horror story that still makes you cringe? Share your experiences, questions, or confessions below—I’m here for the commiseration and the celebration. Happy trails, safe travels, and here’s to every perfectly captured moment in the wild!